

 Use your PC to Master Japanese and Chinese
Character
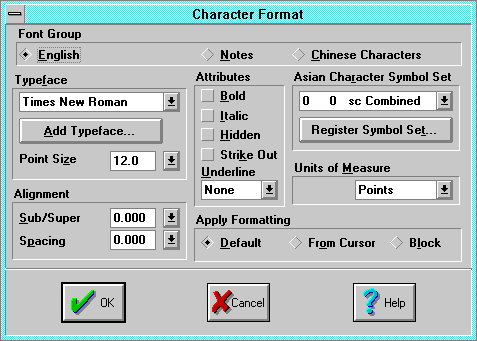 The Character Format dialog applies character formatting, including
typeface(4-
11)
and
symbol set(D-
-
7).
Font Group switches the entire dialog between one of three groups or
categories of
text object(4-
1).
English controls English text objects. Notes controls
annotations: notes, and hiragana, katakana, pinyin, and bopomofo when used as
pronunciations. Chinese Characters controls not only hanzi and kanji,
but also the alphabetic objects when not used as pronunciations.
- Units of Measure sets the units of measure used for character
measurements. Paragraph units are set in the
Paragraph Format(3-
19)
dialog.
- Typeface selects one of up to ten typefaces registered in the
document. Smart Characters documents are created with the type faces registered
in the template on which the document was originally based. Times New
Roman for English and CombinedMing for Chinese characters are the
two default typefaces registered if no template was used. To register a
typeface, select the font group, then select Add Typeface.
- Add TypeFace invokes the Windows
Font(3-
17)
dialog
in English and Notes mode, and the
Chinese Character Typeface(3-
17)
dialog in Chinese character mode. The Chinese character typefaces interact with
the Asian Character Symbol Set: a typeface is typically available only
in a particular
symbol set(D-
-
7),
although similar typefaces may exist in other symbol sets.
- Substitute invokes the same dialog as in Add Typeface, but
the selected typeface replaces the currently selected typeface in the
Typeface list. All characters formatted with the original typeface will
immediately change to the new typeface. Use this control to display characters
formatted using a typeface that is not installed on your system, or is
installed under a different name. See
Changing Typeface Names(13-
4).
- Point Size sets the size (measured by height) of the characters. See
Point Size(D-
-
6).
- Sub/Super sets the relative displacement of the character above or
below the baseline.
- Spacing sets the inter character spacing or kerning, the fixed
horizontal spacing between characters. Variable character spacing (to make
extra room for annotations) is applied by the Format
Annotations(3-
23)
command. Spacing between lines is applied by the Format
Paragraph(3-
19)
command.
- Bold toggles the bold character attribute.
- Italic toggles the italic character attribute.
- Hidden toggles the hidden character attribute.
- Strike Out toggles the strike-out character attribute.
- Underline sets the underline character attribute.
- Asian Character Symbol Set selects one of five symbol sets that can
be used in a document. Most documents use just one
symbol set(D-
-
7).
Documents which use
simplified(4-
10)
characters, user created characters, or lists such as the
concordance files(12-
6)
used by the document conversion utility
ScConv(D-
-
7)
use more than one symbol set.
- These symbol sets are referred to in the document by a
symbol set index(4-
10)
number from 0 to 4. By convention, some of these index numbers have pre-defined
meanings: index 0 is used for the default symbol set. Index 3 is
used for user created characters. Index 4 is used for an embedded
proxy font(D-
-
6).
- The
user characters(4-
10)
symbol set is automatically registered the first time a user character is
inserted in a document. Other symbol sets must be registered as required.
- Register Symbol Set invokes the
Register Symbol Set(3-
18)
dialog to specify a symbol set for each symbol set index. This dialog provides
greater control (e.g., troubleshooting and automatic installation of fonts)
than the simpler and quicker
Pick Symbol Set(3-
24)
dialog.
- Apply Format sets how the formatting will be applied:
- Default sets the default formatting in effect at the beginning of
the document until the first occurrence in the text of a
format code(D-
-
3)
of the same type. Nothing is inserted into the text.
- From Cursor inserts a
format code(D-
-
3)
to format text beginning from the insertion point until the end of the document
or the next occurrence in the text of another format code of the same type.
- Selection formats only the selected text by inserting pairs of
format codes around a selection and deleting any conflicting format codes.
Font
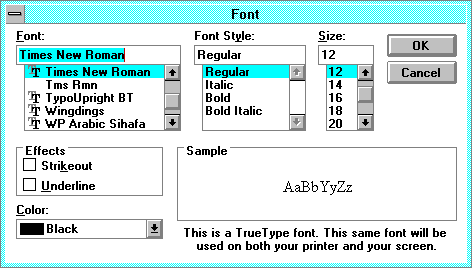 The Windows Font dialog specifies and registers installed Windows
typefaces in a document. It is accessed from the
Character Format(3-
16)
dialog Add Typeface button when the Font Group is set to
English or Notes. Use this to register up to 10 Windows typefaces
in a document.
Font is the typeface name and
symbol set(D-
-
7).
Typical typeface names include:
- Times New Roman is the default English typeface.
- Arial is the Windowsreg. version of a Helveticareg. look-alike
typeface. Typeface designs cannot be copyrighted, but their names can.
- Font Style, Size, Effects select other parameters. You can also
select these parameters in the
Character Format(3-
16)
dialog.
Chinese Character Typeface
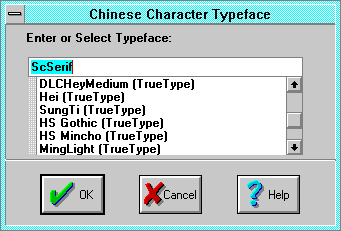 The Chinese Character Typeface dialog specifies Asian language
typefaces. It is accessed from the
Character Format(3-
16)
dialog
Add Typeface button when the Font Group is set to Chinese
Characters. Use this to register up to 10 typefaces in a document.
Smart Characters comes with the CombinedMing typeface, which is a Ming
or Mincho (semi-decorated) style, which is rendered by a 16, 24 and optional 48
point
bitmap font(8-
5),
in the standard
Combined(4-
9)
Japanese and traditional Chinese
symbol set(D-
-
7),
or in the optional
simplified(4-
10)
symbol set. Although you can add additional optional
bitmap(8-
5)
typefaces, for the most flexible and highest-quality printing, it is preferable
to install and use Asian
TrueType(D-
-
8)
fonts.
The optional
DoubleByte TrueType Font Interface(13-
1)
allows use of any Japanese, traditional or
simplified(4-
10)
Chinese font designed for Japanese or Chinese Windows, without running those
versions of Windows (e.g., while running English Windows). Select from the
Asian TrueType fonts installed into the interface. To install TrueType fonts,
see
Setting up the DoubleByte TrueType Font Interface(13-
1).
Register Symbol Set
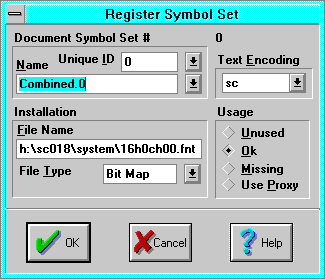 The Register Symbol Set dialog specifies and registers a
symbol set(D-
-
7)
in a document. It is accessed from the
Character Format(3-
16)
dialog Register Symbol Set button, and provides greater control than the
simpler and quicker
Pick Symbol Set(3-
24)
dialog.
Select Document Symbol Set Index selects a
symbol set index(4-
10)
from 0 to 4.
- Unique Symbol Set ID is the
unique symbol set ID(8-
4)
and symbol set name. Typical symbol set names include:
- 0:Combined is the standard
Combined(4-
9)
traditional Chinese and Japanese symbol set.
- 7:SimpleComb is the optional accessory
simplified(4-
10)
Chinese symbol set, which uses simplified characters in place of the
traditional Chinese characters. Do not use this to display Japanese text:
incorrect Japanese characters will display.
- 11:JIS and an early variant 1:JIS(obs) are standard
Japanese-only symbol sets. Smart Characters can open files in their native
formats (e.g., 15:BigFive, 16:GuoBiao) if native fonts are
installed. See the
File Format(3-
2)
dialog and
Installing a Font(8-
5).
- 1013:Trad.Radicals is a symbol set of traditional Chinese
radicals(D-
-
6)
used by an optional
radical and stroke(4-
8)
dictionary.
- 1012:DefaultUser is the factory default symbol set corresponding to
the
user characters(4-
10)
you create on this system.
- 18255:Indiv. User is an example unique workstation user symbol set.
To avoid conflicts with other users, create and install your own unique
workstation user symbol set. See the
Create User Font(3-
45)
command.
- 999:FileName.fn1 is a
proxy font(D-
-
6).
- Text Encoding specifies the
binary code(D-
-
1)
used to convert
extended characters(D-
-
3)
into binary character numbers (bChars). If you have installed native
Japanese or Chinese fonts, you can view documents using native
encodings:
- SC is the default Smart Characters internal code.
- SJS is
Shift JIS(D-
-
7)
Japanese coding.
- EUC is
JIS(D-
-
4)
coding with the high bit set, used on Unix systems.
- JIS coding which does not use extended characters, so is not
recognized by Smart Characters. Use
ScConv(D-
-
7)
to convert JIS files to EUC (or SJS).
- EJS encapsulates JIS coded characters with escape codes, for
bulletin board(D-
-
1)
use. Use ScConv to convert these files to EUC (or SJS).
- BIG5 (
Big Five(D-
-
1))
coding is typically used for traditional characters.
- GB (
GuoBiao(D-
-
4))
coding is typically used for
simplified(4-
10)
characters, and is similar to EUC coding.
- HZ coding is typically used for simplified characters, and is
similar to JIS coding, not using extended characters. Use ScConv to convert HZ
to GB coding.
- UNI is unicode coding, in which half of the characters do not begin
with extended characters. Convert these files to GB or SJS.
- Usage indicates the current usage and status:
- Unused: Smart Characters checks this if the font is not specified.
- Ok: select this if you want to use this font.
- Missing: Smart Characters checks this if the font is missing.
- Use Proxy: select this to request Smart Characters to make or use a
proxy font(D-
-
6)
from a
user font(4-
12).
- Embed User embeds a proxy font in a document.
- Default Font specifies how to search for or select a font if no font
file with the correct symbol set and typeface is installed on the system.
Typeface Name, File Name, and File Type specify a font
file to automatically install and use with this symbol set.
When a document
is opened, Smart Characters tries to install fonts corresponding to the symbol
sets used in the document. If no font file can be found, the characters in that
symbol set will display as missing characters. You can retry the installation
by specifying a new name or wildcards in the File Name edit control.
Smart Characters automatically determines file types, so it is generally not
necessary to specify a new
font file type(8-
4).
Paragraph
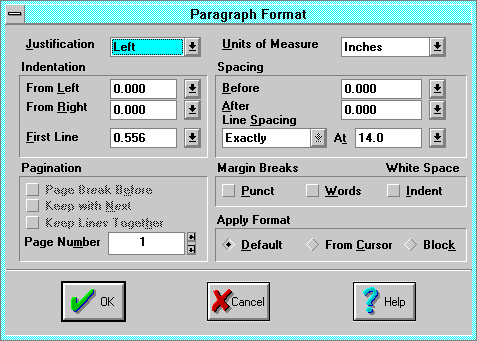 The Paragraph Format dialog applies paragraph formatting.
- Alignment selects the position of the text to be controlled by
margins or indents.
- Left aligns a paragraph to the left indent or margin.
- Centered centers a paragraph between set indents or margins.
- Right aligns a paragraph to the right indent or
margin.
Full expands and adds spaces in each line to align the
paragraph to both the left and right indents.
- Indentation selects the starting position of the text in relation to
the margins. Margins are set in the
Page Setup(3-
21)
dialog.
- From Left indents a paragraph from the left margin. A negative
measurement setting aligns starting text to the left of the margin.
- From Right indents a paragraph from the right margin. A negative
measurement setting aligns text to the right of the margin.
- First Line indents the first line of the paragraph starting from the
left indent. A positive setting produces an indented first line. A negative
measurement setting produces a hanging indent in which the first line
begins to the left of an indented paragraph.
- Pagination specifies how Smart Characters handles paragraphs in
relation to each other.
- Page Break Before inserts a page break before a paragraph.
- Keep With Next prevents a page break between a paragraph and the
following paragraph.
- Keep Lines Together prevents a page break within a
paragraph.
- Page Number sets the page number of the current page.
- Units Of Measure selects the units to apply to page formatting
measurements, (e.g., paper size, margins, and indents) in six different units:
points, inches, centimeters, picas and points, rows & columns, and screen
pixels(D-
-
6).
Character formatting (e.g., font size, paragraph spacing, and line spacing)
units are selected by the
Character Format(3-
16)
dialog, but are almost always specified in points.
- Paragraph Spacing specifies the amount of space between
paragraphs.
- Before adds space above the first line of a paragraph, but not at
the top of a page.
- After adds space below the last line of a paragraph, but not at the
bottom of a page.
- Line Spacing indicates the amount of vertical space allowed for each
line of text.
- Auto sets no minimum height. Each line is as tall as the tallest
character in that line, but no taller.
- Single sets spacing width to one single line.
- 1.5 Lines sets spacing width to one-and-one-half lines.
- Double sets spacing width to two lines.
- At Least sets a minimum line spacing that Smart Characters can
increase.
- Exactly sets a fixed line spacing that Smart Characters does not
adjust.
- At: type or select the amount of space you want between lines.
Characters taller the line space will overlap with the previous line when
printed.
- Punct Margin Breaks instructs Smart Characters to not relax
the margin for punctuation characters (e.g., periods and commas) that generally
look better when printed outside the margin just after the last text character
in a line.
- Words Margin Breaks instructs Smart Characters to break lines at
word boundaries if possible, which provides a more ragged display that is
helpful to beginning language students.
- Indent White Space instructs Smart Characters to treat initial white
space (spaces and tabs) on a line as an indentation when creating a paragraph
using the
Format into Paragraph(3-
25)
command.
- Apply Format sets how the formatting will be applied:
- Default sets the default formatting in effect at the beginning of
the document until the first occurrence in the text of a format code of the
same type. Nothing is inserted into the text.
- From Cursor inserts a
format code(D-
-
3)
to format text beginning from the insertion point until the end of the document
or the next occurrence in the text of another format code of the same type.
- Selection formats only the selected text by inserting pairs of
format codes around a selection and deleting any conflicting format codes.
Borders
The Borders command creates borders around paragraphs, but is not
implemented in this release of Smart Characters.
Tab
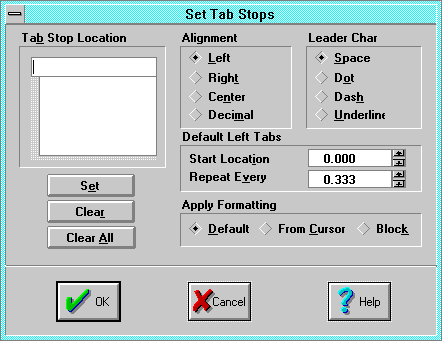 The Tabs dialog sets tab stops, and specifies the tab leader
character.
For most purposes, adjust Repeat Every (and possibly Start
Location) to set up uniform default tabs. These tab stops work globally
over the entire document, and are active for positions after the last (highest)
individual tab stop location.
To set individual tab stops:
- Select the paragraphs for which you want to specify or edit tab stops, or
position the insertion point where you want to begin using new tab stops, then
select Format | Tabs and make a selection under Apply Formatting.
- In the Tab Stop Location box, type the position at which you want
to set a tab.
- Check the Alignment and Leader Char options, then select
Set. The new tab will appear in the list box. Individually entered tab
stops override the default tabs up to the highest individual tab stop.
- To delete a tab, select it from the list box, then select Clear.
Page Setup
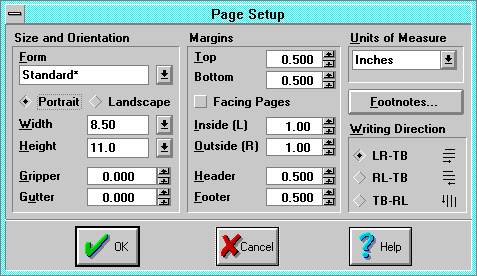 The Page Setup dialog sets margins, paper size and source, footnote
options, and the direction the text appears on the page.
- The Form list box lists the currently defined forms. Select an
existing form to update the document (and the dialog) with its parameters, and
make it the default form.
To create a new form, simply enter a new form
name in the Form edit control, edit the other controls to define the
form, and select OK.
- If you create a new form or change any of the parameters in the Page
Setup dialog, the
Save Form Query(A-
-
5)
dialog will ask if you wish to create or update the existing form with the new
values. Select Yes to save the form for use in other documents. Select
No to keep the form private to the active document.
Size and
Orientation displays options for setting forms, orientation, and paper size.
- Orientation: choose the direction you want the text to appear on the
page.
- Portrait
 Landscape

- Width and Height are the paper dimensions.
- Gripper is the value of the portion of the page (if any) that is
lost at the top of the page in portrait orientation.
- Gutter specifies the distance to add to the left margin of all pages
if you clear the Facing Pages option or to add to the inside margin of
all pages if you select Facing Pages.
- Margins adjusts the margins.
- Top specifies the distance between the top of the page and the top
of the first line on the page.
- Bottom specifies the distance between the bottom of the page and the
bottom of the last line on the page.
- Facing Pages makes margins on facing pages mirror each other. Select
this option when you print double-sided pages.
- Inside (Left) specifies the distance between the left edge of the
page or the right edge of the gutter margin (if selected) and the left end of
each line with no indent on odd-numbered pages, and the distance between the
right edge of the page and the right end of each line with no indent on
even-numbered pages.
- Outside (Right) specifies the distance between the right edge of the
page and the right end of each line with no right indent on odd-numbered pages,
and the distance between the left edge of the page and the left end of each
line with no left indent on even-numbered pages.
- Header specifies the distance between the top of the page and the
baseline of the first line of the header.
- Footer specifies the distance between the baseline of the footer and
the bottom of the page.
- Units Of Measure: select points, inches, centimeters, points and
picas, row & col, and
pixels(D-
-
6).
- Footnotes invokes the
Footnote Settings
dialog
.
- Writing Direction selects the direction of writing.
- LR-TB is short for left to right, then top to bottom,
which is normal "English" writing style.
- RL-TB is short for right to left, then top to bottom,
which is frequently used in Chinese writing.
- TB-RL is short for top to bottom, then right to left
vertical writing used in both Chinese and Japanese.
- Smart Characters is unique in providing for full editing in all writing
modes. The arrow keys work according to a logical LR-TB line. However, unless
you are using a very high resolution display (1280x1024 or higher), it is best
to edit in LR-TB writing direction, and switch to TB-RL for touch up and
printing.
Footnote Settings
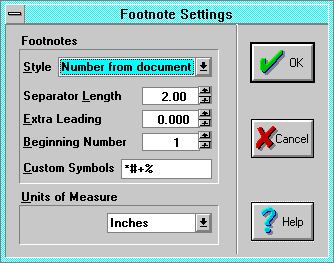
- The Footnote Settings dialog is invoked by the Footnotes
button in the Format
Page Setup(3-
21)
dialog
.
Footnotes are inserted into the text using the
Footnote(3-
12)
command.
- Style
Number from document numbers footnotes sequentially
throughout the document.
- Number from page numbers footnotes starting at the beginning number
at each new page.
- Symbols from page displays footnotes as symbols beginning at each
new page.
- Custom Character displays each footnote with a custom character.
- Endnote Numbers numbers endnotes sequentially throughout the
document.
- Separator Length sets the footnote separator length. Set to zero to
suppress a footnote separator.
- Extra Leading adds leading (line spacing) between footnotes.
- Beginning Number sets the initial footnote number.
- Custom Symbols specifies symbols to use when the Footnote
Style is set to Symbols from page.
- Units Of Measure: select points, inches, centimeters, points and
picas, row & col, and
pixels(D-
-
6).
Frames
The Frames command is not implemented in this release of Smart Characters.
Annotations
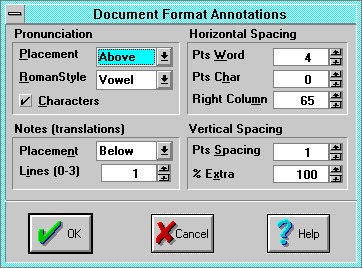 The Format Annotations dialog controls annotations formatting, which
apply to the entire document when annotation display is enabled by the
View
Annotations(3-
7)
command.
Pronunciation Placement selects how to display each Chinese character's
phonetic sound (furigana in Japanese).
Off does not display pronunciations. Use this function to make sure you
are able to read without notes or pronunciations, the presumed objective of
Asian language study.
- Inline displays to the immediate left of the character.
Because syllables are duplicated, the result does not make sense grammatically.
It is useful only when accompanied by turning the Chinese Character
display off, in which case the document will display in all phonetic script.
- Right Column displays pronunciations on the right hand side of the
page, starting in the Right Pronunciation Column (default 65). If you
have text in column 65, the text will overwrite the pronunciations, or vice
versa.
- Above and Below display immediately above and below the
character. Use Vertical Spacing | Pts Spacing to set the spacing from
the characters.
- Pronunciation Roman Style controls the display of pinyin tones, and
conversion of bopomofo to pinyin and vice versa. The three pinyin styles
convert bopomofo pronunciations to pinyin if necessary, and display the pinyin
in the selected style. The Bpmf style converts pinyin to
bopomofo.
- As Is displays pronunciations as they are in the file according to
the active keyboard and installed fonts (if any). No conversions are performed.
- Vowel marks the first vowel of the last portion of the syllable with
tones 1-4. The 5th tone is not marked.
- 12345 displays tone numbers after each syllable.
- ^/_\. displays tone symbols after each syllable.
- Off does not display tones.
- Bpmf converts pinyin to bopomofo if necessary. Bopomofo displays
tones 2-5 as end symbols. The first tone is not marked.
- Note: Conversions are performed on a line by line basis as the document is
displayed. Conversions work between valid pinyin and bopomofo syllables:
invalid combinations will not cross convert. Conversions are performed in
accordance with the
macro keyboard(4-
6)
file ChiRules.kbd, which you can edit.
- Characters, if checked, displays Chinese characters, and alphabetic
objects (e.g., bopomofo and hiragana) that immediately precede a
Chars(D-
-
2)
text object are treated as pronunciation, and displayed according to the
Pronunciation formatting. If Characters is unchecked, Chinese
characters are not displayed, and pronunciation objects are displayed full size
in line.
- Notes (translations) Placement controls the display of Notes
text objects(4-
1)
similarly to the pronunciation display. Notes objects display in a small
English font and are used for
glosses(D-
-
4)
(short translations) of the following word or phrase. Notes objects also
function as word separators and can be empty, consisting of just the
notes code(5-
8).
Notes
Lines sets the number of lines (from 0 to 4, default 1) that can be used
for notes to avoid overlapping or misplaced glosses in a fully-annotated
document.
Horizontal Spacing Pts Word Space sets the amount of extra
variable word spacing(4-
14)
to insert for each Notes object. Use this to separate words by inserting a
Notes code before each word by pressing Space (or ^D). Word space does not
display in the first column, or when the notes placement is set to
InLine or Left.
Horizontal Spacing Pts Char Space sets the amount of extra horizontal
spacing to insert after each Chinese character to accommodate the wider Chinese
pronunciations.
Horizontal Spacing Right Column specifies how far outside the right hand
margin to start to display pronunciations and notes in Right
placement.
Vertical Spacing Pts. Spacing sets the amount of extra line spacing to
insert for each pronunciation object when displayed Above or
Below.
Vertical Spacing % Extra adjusts the variable vertical spacing to allow
for loosening or tightening to taste.
Input Mode Conflict with Annotation Format
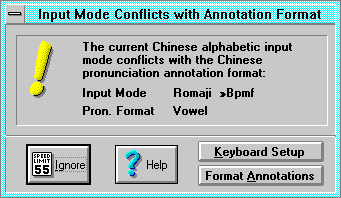 The Input Mode Conflict with Annotation Format dialog notifies you of a
conflict between the Chinese pronunciation Roman Style and the active
input mode. If you do not resolve this conflict, the keyboard will behave
strangely as you type in one mode, it is converted to another, and back again,
losing keystrokes in the process.
Ignore cancels the dialog.
Keyboard Setup invokes the Keyboard
Setup(3-
26)
dialog.
Format Annotations invokes the Format
Annotations(3-
23)
dialog.
Symbol Set
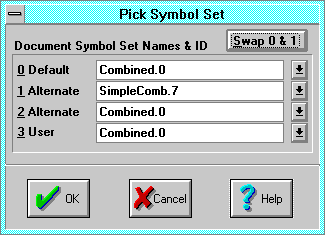 The Pick Symbol Set dialog registers and manages
symbol set(D-
-
7)
in a document, enabling the document to display characters from up to four
different symbol sets and
encoding methods(D-
-
3).
Typical uses include displaying
simplified(4-
10)
and traditional Chinese characters, user-defined characters, and symbol sets
corresponding to fonts from native word processors (e.g., JIS, Big5, and GB). A
symbol set is identified by its name and
unique symbol set ID(8-
4).
Chinese characters are interpreted according to their symbol set and the
encoding method. Smart Characters documents contain a
symbol set index(4-
10)
that holds up to five symbol sets and encoding methods. Chinese characters are
associated with a symbol set by applying a symbol set index
format code(D-
-
3)
numbered 0-4 using the
Character Format
dialog Asian Character Symbol Set control. This format code includes
only the index number, not the actual symbol set or encoding method.
- Swap 0 & 1 swaps symbol set indexes 0 and 1. This
command is useful only if two symbol sets are related, meaning that the same
character number(D-
-
2)
has related meanings in both symbol sets. Use this to switch between the
related Smart Characters
Combined(4-
9)
traditional and
simplified(4-
10)
symbol sets.
- 0 Default is used for the default symbol set, which is typically the
Combined(4-
9)
Japanese and traditional Chinese symbol set for Smart Characters documents, or
a native symbol set for interpreted (not converted) documents from native word
processors.
- 1 Alternate is used for the first alternate symbol set, typically the
simplified(4-
10)
Chinese symbol set or a standard native symbol set.
- 2 Alternate is used for an additional alternate standard native
symbol set.
- 3 User is used for
user characters(4-
10).
A user characters symbol set is automatically registered the first time a user
character is entered in a document. Other symbol sets must be registered as
required.
- Note: symbol set 4 is used for an embedded
proxy font(D-
-
6).
Symbol
sets which are already installed into Smart Characters can be registered into
the current document into index numbers 0-3. To register a symbol set, choose
which index number to use, then select the symbol set name and unique id in the
corresponding drop down list control. The encoding method will be the default
encoding method for that symbol set. If you want to use a different encoding
method, or are having difficulties, use the
Register Symbol Set(3-
18)
dialog.
Format into Paragraph
The Format into Paragraph command formats selected text into single or
multiple paragraphs. An empty line is treated as a paragraph break. To treat
initial white space as an indent, check the White Space Indent control
in the
Paragraph Format(3-
19)
dialog.
Set to Default
The Set to Default command formats selected text with the default
formatting.
Format codes(D-
-
3)
are inserted at the insertion point as necessary so that text immediately
following the insertion point reverts to the default formatting.
Remove Codes
The Remove Codes command removes
format codes(D-
-
3)
from selected text. This does not restore default formatting to the text,
rather it ensures that the formatting in effect at the start of the selected
text is uniform throughout the text. To set text to the default format, use the
Set to Default(3-
25)
command.
- Character removes character formatting. See the
Character Format(3-
16)
dialog.
- Paragraph removes paragraph formatting. See the
Paragraph Format(3-
19)
dialog.
- Character and Paragraph removes both character and paragraph
formatting.
- Asian Symbol Set removes Asian
symbol set index(4-
10)
formatting. See the
Symbol Set(3-
24)
and the
Register Symbol Set(3-
18)
dialogs.
- All removes character, paragraph, and Asian
symbol set(D-
-
7)
index format codes.
Entering Measurement Units
Smart Characters accepts measurements for items such as paragraph spacing and
font sizing in six different units: lines, inches, centimeters, points, rows
& cols, and picas.
- To enter measurements in a dialog box control in the default units, type
the number, click the Up or Down scroll bar buttons, or press
Ctrl+V to paste the number from the
Windows clipboard(D-
-
9).
- To enter measurements in units other than the default, follow the
number with one of the following abbreviations:
To specify   Type     ConversionConversion
                      :Units
Centimeters  cm       2.54 cm = 1 in
Inches       in or "  1 in = 72 pt = 6 pi
Lines        li       1 li = 1/6 in = 12
                      pt
Picas        pi       1 pi = 12 pt = 1/6
                      in
Points       pt       1 li = 1/6 in = 12
                      pt


 Apropos Customer Service home
page 617-648-2041
Last Modified: March 23, 1996
Copyright © 1996 Apropos, Inc.
 The Register Symbol Set dialog specifies and registers a
symbol set(D-
-
7)
in a document. It is accessed from the
Character Format(3-
16)
dialog Register Symbol Set button, and provides greater control than the
simpler and quicker
Pick Symbol Set(3-
24)
dialog.
 The Character Format dialog applies character formatting, including
typeface(4-
11)
and
symbol set(D-
-
7).
 The Windows Font dialog specifies and registers installed Windows
typefaces in a document. It is accessed from the
Character Format(3-
16)
dialog Add Typeface button when the Font Group is set to
English or Notes. Use this to register up to 10 Windows typefaces
in a document.
 The Chinese Character Typeface dialog specifies Asian language
typefaces. It is accessed from the
Character Format(3-
16)
dialog
Add Typeface button when the Font Group is set to Chinese
Characters. Use this to register up to 10 typefaces in a document.
 The Paragraph Format dialog applies paragraph formatting.
 The Tabs dialog sets tab stops, and specifies the tab leader
character.
 The Page Setup dialog sets margins, paper size and source, footnote
options, and the direction the text appears on the page.
 Landscape


 The Format Annotations dialog controls annotations formatting, which
apply to the entire document when annotation display is enabled by the
View
Annotations(3-
7)
command.
 The Input Mode Conflict with Annotation Format dialog notifies you of a
conflict between the Chinese pronunciation Roman Style and the active
input mode. If you do not resolve this conflict, the keyboard will behave
strangely as you type in one mode, it is converted to another, and back again,
losing keystrokes in the process.
 The Pick Symbol Set dialog registers and manages